1. General Design Principles
General design principles applicable on all DINA modules.
1.1. Layers
The targeted architecture is a based on a 3-layer architecture. Communication between layers would be done using DTOs (Data Transfer Objects) or Entities depending on the layer.
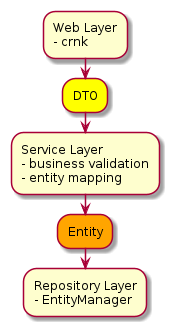
1.1.1. Repository Layer
-
Tightly coupled to the service and mapping layer.
-
Communicates to the service layer for access to database resources but never contacts the database directly.
-
Communicates to the mapping layer to process entities into DTO’s and vise versa.
-
Processes incoming HTTP requests for the API endpoint to send the appropriate response.
-
Processing of incoming HTTP request.
-
Communication to the service layer is usually done through the use of entity classes, and communication to the HTTP layer is usually done through the use of DTO’s which have been mapped from their database backed entity representations.
-
Each repository requires a specific database service class implementation and a mapper.
1.1.2. Service Layer
-
Mainly used for database access and entity processing before CREATE/UPDATE/DELETE operations.
-
Has methods that can be over ridden to inject business logic to process entities before CREATE/UPDATE/DELETE operations. Most notably the
preCreate preUpdate preDeletemethods.
    @Override
    protected void preCreate(Person entity) {
      entity.setUuid(UUID.randomUUID());
}-
Should be used for typical pre-persist, pre-update, and pre-delete operations when they can be applied.
1.1.3. Mapping Layer
The Mapping Layer refers to layer that is responsible for mapping the values of a Resource between its entity and Dto class.
The Mapping Layer involves three main components:
-
The DinaMappingRegistry which tracks all the needed information for a Resources domain
-
The DinaMappingLayer which is responsible for mapping a dto to an entity and vice versa using the mapping registry and the DinaMapper. The DinaMappingLayer is also responsible for handling external relations, and will link internal relations to database backed equivalents.
-
The DinaMapper which is responsible for recursive bean to bean mapping for the entire resource graph which can be extended to apply custom field mappings for specific fields.
-
Mapper has mechanisms in place to allow for the exclusion of fields and/or relationships during the mapping process.
-
Mappers should not communicate with the service layer to map relations directly.
-

1.1.4. Mapping Layer concepts
When mapping between an entity and a Dto, each field needs to transferred from one object to another. However, the values do not map directly.
Resource Graph
All of the attributes of a resource can be mapped directly however the resources associations with other resources must also be mapped between their own DTO/entity equivalents.
These associations are referred to as relations.

You can visualize a resource and all of it’s associations as a graph.

If ResourceA has a ResourceB, ResourceB has a ResourceC, and ResourceC has a ResourceA, they each need to mapped appropriately when mapping ResourceA
The Mapping Layer needs to distinguish between relations and attributes when reading the associated java classes.
Relation
-
A relation is a field that is marked as a
@JsonApiRelationon The DTO and is not marked with@IgnoreDinaMapping. -
These fields are not mapped directly instead the values themselves must also be mapped and transferred.
-
A relation is considered internal unless marked with
@JsonApiExternalRelation. -
External relations represent an association with a resource in a separate module and will not be mapped to their database equivalent.
  public static final class StudentDto { // DTO Class

    @JsonApiRelation // Maps to related entity
    private StudentDto normalRelation;

    // Maps to related entity, un marked
    private List<TaskDTO> anotherRelation;

    @JsonApiExternalRelation(type = "agent")
    @JsonApiRelation // External Relations always map between ExternalRelationDto and UUID
    private ExternalRelationDto externalRelation;

  }

  public static class Student { // Entity Class

    private Student normalRelation; // Maps to related entity

    private List<Task> anotherRelation; // Maps to related entity

    private UUID externalRelation; // External Relations maps to ExternalRelationDto/UUID
  }
Attribute
-
An attribute is a field that is not
@IgnoreDinaMappingor marked as a relation and will be mapped directly as a value. -
An attribute must have the same data type on the DTO class and its related entity.
-
A field that is considered an attribute (Unmarked) but has a valid DTO/RelatedEntity mapping between the data types will be considered a relation.
  public static final class StudentDto { // DTO Class

    private String name; // attribute, has same data type

  }

  public static class Student { // Entity Class

    private String name; // attribute, has same data type

  }
1.2. Resource Id as UUID
All database identifiers should be numerical based since it`s efficient and easier to manage at the database level. Even if there is no issue about leaking business information we will still expose UUID instead of the database key in the API. This will give us more flexibility at the database level while reducing potential issues with API users iterating over ids or using a wrong set of ids. Based on the “Inter-module foreign key” module, UUID’s will help detect wrong linkages by making it almost impossible to reuse a key of the wrong resource. Numerical id’s can be reused in different resources (even if this can be solved by using a global sequence) while UUID are more likely to be unique across the system.
1.3. Inter-module foreign keys
To reduce referential integrity violation while maintaining the system simplicity and easy of use, the following rules should be applied:
-
Soft-delete only: entities should never be completely deleted. Instead, they should have a deletedDate property setting the date of deletion. Such entity should return a 410 Gone instead of a 404, with a body indicating how to access the deleted entity (e.g. sample/cf71a71e-2176-4d6f-9f17-a4c4f3dd104e?deleted=true)
-
Each modules should have an asynchronous job to report all external foreign key usage.
-
There is no enforcement on insert/update since services can not talk to another service to check if the key actually exists
1.4. Inter-module communication
All inter-module communications are coordinated by the client (e.g. the integrated UI). In order to reduce coupling and increase maintainability, no modules are allowed to talk to each other directly. In the event where 2 modules shall communicate, a new “proxy” module should be created to orchestrate the communication but it should be avoided. No distributed transactions mechanism will be implemented. Possible inconsistencies due to a “transaction” that would require 2 modules, where 1 is temporary down, are acceptable as long as there is a way to report them.
Pros: * A module will not be able to take another one down * Simpler module deployment and maintenance
Cons: * No referential integrity enforcement on external foreign keys * No direct feedback to the API user on a possible bad linking between 2 services
2. Design and Implementation Considerations
This page should be interpreted as a guideline to achieve consistent and predictable design during the entire lifecycle of the application. Some concepts are coming from the Domain Driven Design approach and it will also refer to the SOLID principles to back some design decisions.
This page should not be considered a static set of rules. It will evolve over time as we iterate over the project. For all code produced, it should follow this guide or provide documentation explaining why. If the explanation can be generalized and the “concept” can be applied in the entire project this guide should be updated.
2.1. Spring DI
Use constructor injection for all mandatory dependencies and ensure dependencies are marked as final. It will make the class more testable and also make sure that class can be used without Spring DI (as opposed to field injection).
2.2. Use of DTOs
In order to detach the object exposed and the one that is stored we will use DTOs to transfer data between the web and the service layer. The changes at web layer are driven by how the user of the service wants to use it while the changes at the service/repository layers are driven by how we do business and how we store data.
2.3. Domain Object/Entity
For simplicity we will use the following descriptions:
Domain Object
Objects from the business specific area that represent something meaningful to the domain expert.
Entity
Domain Object + Identifier
We should always try to push business logic inside the Entities when it makes sense. The current rules are the following:
Business logic should be part of the entity if: - The business logic doesn’t require external services (lazy loading is considered an external service) - The business logic only requires the data available in the entity (including nested entities)
If the business logic cannot follow those rules, it should live in the service layer.
2.4. Always-Valid Entity
When possible, we should try to make our entities always-valid even if it can be tricky with Hibernate.
-
Throw exception if giving bad data (e.g. mandatory fields)
-
Constructor always leaves the entity in a valid initial state. Sensible default values are provided and constructor allows providing mandatory values. A builder could also be provided.
-
Update entities by a context-specific methods so that they are never in inconsistent states
-
Use private setters if 2 or more fields are linked (e.g. Rectangle, setHeight and setWidth shall be private but setDimension should be public)
-
The validations mentioned above refer to the business definition of valid. The maximum length of a field in the database is not part of the business; this should be handled by the entity validation (see Validation: General Principles section).
2.5. Validation: General Principles
2.5.1. DTO
Data coming from outside (command-line, web request) should but stored (upon arrival) inside a DTO. The DTO can be transferred to the Service layer where it is validated using Bean Validation annotations. Validation should use the Notification pattern instead of throwing exceptions.
2.5.2. Entities
Most of the entities are not a simple data structure; they should have domain-level validation inside them so that they are always-valid. This is more a goal than the current reality. We should use a Validator based on Bean Validation 2.0 specification to validate the entities using their annotations.
2.5.3. DTO - Entity Mapping
Once we received and validated a DTO, we have to map it to one or more entities. This process could trigger some exception leading to more validation results.
2.5.4. Service
Dina-base 0.51 onward, we disable the automatic validation and move it to the Service layer where Spring integration is better. As a result, DTOs are no longer validated using Bean Validation annotation, instead they are transferred to the Service layer where they will be validation upon creation/update.
3. Test Support
dina-test-support package is a set of utility classes to simplify testing in the different DINA Modules.
3.1. Running integration tests against a Postgres Docker container using PostgresTestContainerInitializer
Initializes a Postgres TestContainer if the "embedded.postgresql.enabled" property is true.
Use this initializer in integration tests by adding this annotation to your test class:
@ContextConfiguration(initializers = { PostgresTestContainerInitializer.class })You need to have the correct Spring launch properties set when running tests to enable the Postgres container:
spring:
  datasource:
    username: web_user
    password: test
  liquibase:
    liquibase-schema: object_store
    user: migration_user
    password: test
embedded.postgresql:
  enabled: true
  image: postgres:10.14
  init-script-file: create-test-users.sql
  database: object_store_test
  schema: object_store
3.2. OpenAPI3Assertions
OpenAPI3Assertions contains methods to run assertions between an API response and an OpenAPI 3 specification’s schema. Some of the Open API 3 files could be
stored on remote servers potentially making the tests unstable. When OpenAPI3Assertions.assertRemoteSchema is used, the system property testing.skip-remote-schema-validation can be used to temporarily skip the validation of an API response against a remote schema.
3.3. Mock Keycloak User
@WithMockKeycloakUser can be used on a test to have a Keycloak security context created for testing purpose.
For usage see WithMockKeycloakUserIT.
4. Testing
Decisions and Guidelines related to testing for the seqdb-api project. Definitions are based on Testing Concepts.
4.1. Unit Tests
General Definition: https://martinfowler.com/bliki/UnitTest.html
Unit test shall follow the Unit tests naming convention: unitOfWork_StateUnderTest_ExpectedBehavior
4.2. Integration Tests
General Definition: https://martinfowler.com/bliki/IntegrationTest.html
Classes shall use the IT suffix. As per Failsafe defaults
5. Authentication
5.1. Getting the current user
To get the current user, you can inject a DinaAuthenticatedUser into the constructor:
@Named
@Log4j2
public class MyClass {

  private DinaAuthenticatedUser currentUser;

  public MyClass(DinaAuthenticatedUser currentUser) {
    this.currentUser = currentUser;
  }

  public void logCurrentUserName() {
    log.info(currentUser.getUsername());
  }

}
Event though 'MyClass' is an application-scoped bean, Spring injects a DinaAuthenticaedUser proxy object that resolves to the actual request-scope DinaAuthenticatedUser bean when DinaAuthenticatedUser’s methods are called. So calling logCurrentUserName() will print the currentUser for the current API request.
5.2. Using a dev-mode user without needing to authenticate manually
To have a 'dev' user set automatically without needing to authenticate via Keycloak token or other manual method, set these properties:
keycloak.enabled: false and dev-user.enabled: true (must be set together).
If specific group/role is required, use the following config:
dev-user:
  enabled: true
  groupRole :
    aafc :
      - user
    bicoe :
      - read-only
6. Setting up your Dina Repo for authorization
6.1. Overview
A dina repository can optionally take a DinaAuthorizationService implementation, which if present will be used to call a set of specific methods for CREATE/READ/UPDATE/DELETE operations.
The DinaAuthorizationService is an interface defining the following methods: authorizeCreate, authorizeRead, authorizeUpdate, authorizeDelete.
Where each method is called by the dina repo for the appropriate operation on a given entity for that repo’s domain.
Please note that create, update and delete require read access to perform those actions. Read access should be the same or lower than the other operations.
6.2. Step by Step: Using a custom Dina Authorization Service
-
Create your Dina Authorization Service implementation
@Service
@RequiredArgsConstructor
public class CustomAuthorizationService implements DinaAuthorizationService {

  @Inject
  private final Optional<DinaAuthenticatedUser> user;

  @Override
  public void authorizeCreate(Object entity) {
    if (!(user.isPresent()) || !(entity instanceof DinaEntity)) {
      return;
    }

    DinaEntity dinaEntity = (DinaEntity) entity;
    Set<String> userGroups = user.get().getGroups();

    if (CollectionUtils.isEmpty(userGroups) || dinaEntity.getGroup() == null) {
      throw new ForbiddenException("You shall not pass");
    }

    if (userGroups.stream().noneMatch(dinaEntity.getGroup()::equalsIgnoreCase)) {
      throw new ForbiddenException("You shall not pass");
    }
  }

.....-
Pass your Dina Authorization Service to your Dina Repository
-
Your dina repo will now use your Dina Authorization Service.
6.2.1. Using the default Group Authorization Service
When keycloak is enabled a default Group Authorization Service bean is available in the application context that can be injected into your Dina Repositories
-
Pass the Group Authorization Service to your Dina Repository
  @Inject
  private Optional<GroupAuthorizationService> groupAuthService;

  @Bean
  public DinaRepository<PersonDTO, Person> dinaRepository() {
    return new DinaRepository<PersonDTO,Person>(
      dinaDatabaseService,
      groupAuthService,

    ....
}-
Run with
keycloak.enabled = true -
Your dina repo will now use the default Group Authorization Service. See GroupAuthorizationService.java.
6.3. Returning your permissions for an object
You can have permissions for three types of operations as evaluated by the dina authorization service.
-
create
-
read
-
update
-
delete
When keycloak is enabled you can send a GET request and view your permissions for an object.
Step 1 - Setup your resource
Your resource DTO must extend the AttributeMetaInfoProvider.
  public static class ThingDTO extends AttributeMetaInfoProvider {
    @JsonApiId
    private Integer id;
    private UUID uuid;
    private String name;
  }
Step 2 - Send your request with include-dina-permission
Send a GET request to a resource and add the Header include-dina-permission to your HTTP request.
{
   "data":[
      {
         "id":"475c1dc4-99c0-4a56-8177-3f00e4f151e1",
         "type":"person",
         "meta":{
            "permissionsProvider":"SpecialAuthServiceUnderTest",
            "permissions":[
               "create",
               "update"
            ],
            "warnings":null
         },
         "attributes":{
            "name":"jim"
         }
      }
   ]
}
7. CORS: Cross-Origin Resource Sharing
7.1. Enabling CORS
When a dina-base-api based application is running behind Keycloak, CORS must be enabled through a Keycloak configuration.
In an application.yml:
keycloak.cors: trueKeycloak’s CORS support is configured per client. You specify the allowed origins in the client’s configuration page in the admin console. You can add as many you want. The value must be what the browser would send as a value in the Origin header. For example http://example.com is what you must specify to allow CORS requests from example.com. When an access token is created for the client, these allowed origins are embedded within the token. On authenticated CORS requests, your application’s Keycloak adapter will handle the CORS protocol and validate the Origin header against the allowed origins embedded in the token. If there is no match, then the request is denied.
Chapter 15. CORS
8. Filtering
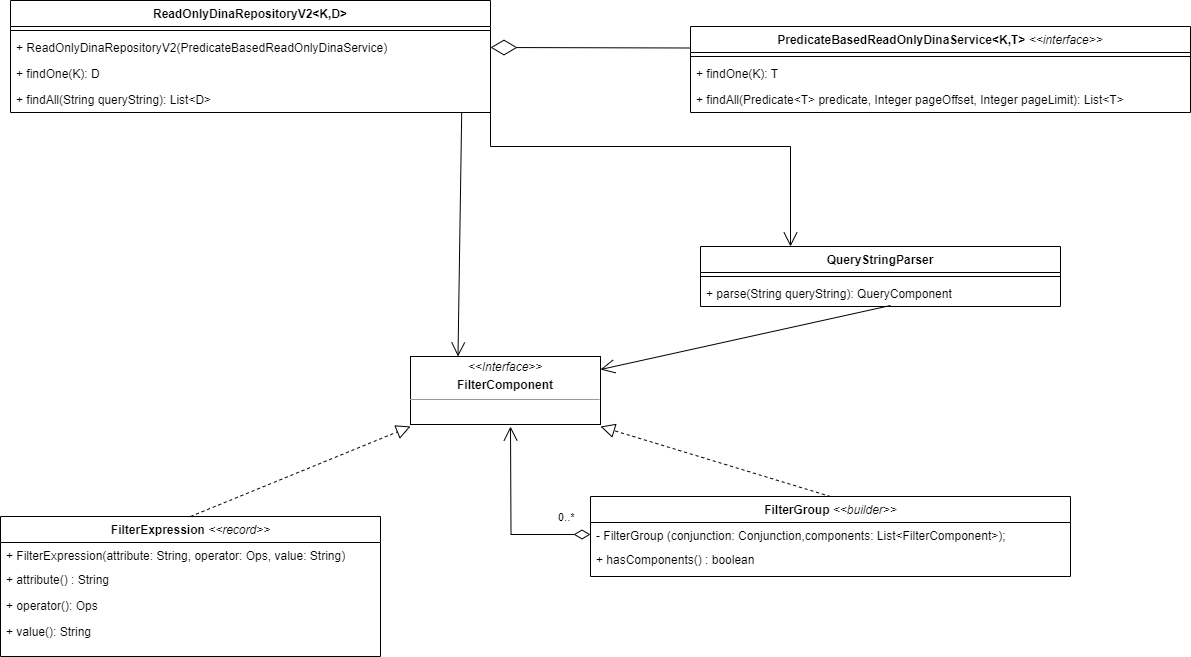
The main component used to represent a filter expression is the FilterExpression class. It consists of an attribute, operator, and value to define the filter condition.
A FilterGroup is used to group multiple filter components together and combine them using either the "AND" or "OR" conjunctions.
For example, consider the following simple filter:
GET /person?filter[firstName][EQ]=John&filter[lastName][EQ]=DoeCould be expressed using the following filter components:
FilterGroup.builder()
  .conjunction(Conjunction.AND)
  .component(new FilterExpression("firstName", Ops.EQ, "John"))
  .component(new FilterExpression("lastName", Ops.EQ, "Doe"))
  .build();
9. Actuators
DINA modules can be configured to expose Spring Actuators.
In the module application.yml or using environment variables:
-
Change
security-collections.patternsto/api/*to tell Keycloak adapter to only filter on/apiand leave other requests to the other filters in the chain. -
Add
actuator.allowedIpto define the IPs that are allowed to access the actuators. Network mask should limit to internal IPs but cautions should be taken when an external request is routed by a Gateway/Reverse-Proxy. Depending on the settings, the module could see the request as coming from the internal network. In Docker-Compose, the name of the container can be used to restrict the IP to the Prometheus container for example. -
Add
management.endpoints.web.exposure.include: "health,prometheus"
Then, a Prometheus container can be configured to connect to the /actuator/prometheus endpoint of a module.
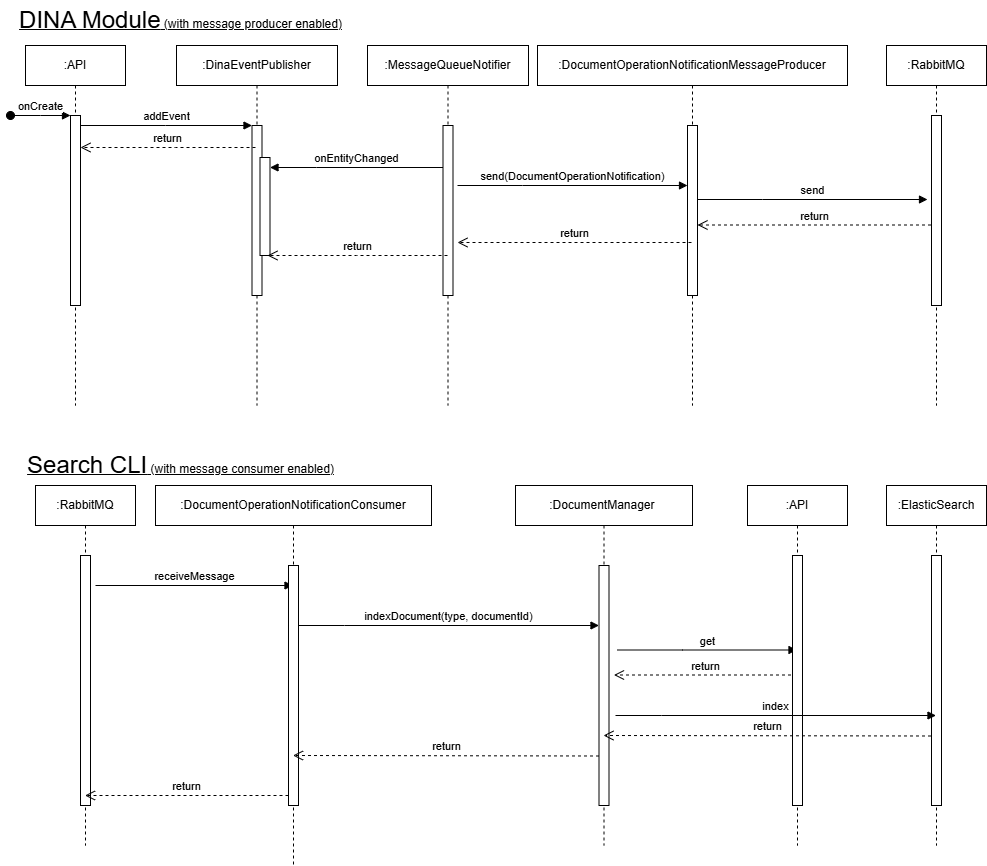
10. Messaging
10.1. How Messaging is working ?
Messaging in DINA is implemented as an asynchonous process around RabbitMQ.
There are 2 types of messages:
-
DocumentOperationNotificationfor everything related to keep the search indices in sync -
DinaMessagefor more generic messages (e.g. object export notifications from object-store-api)
Example of how different components are integrated for DocumentOperationNotification. Some details are not included for readbility.
10.2. Messaging-related classes
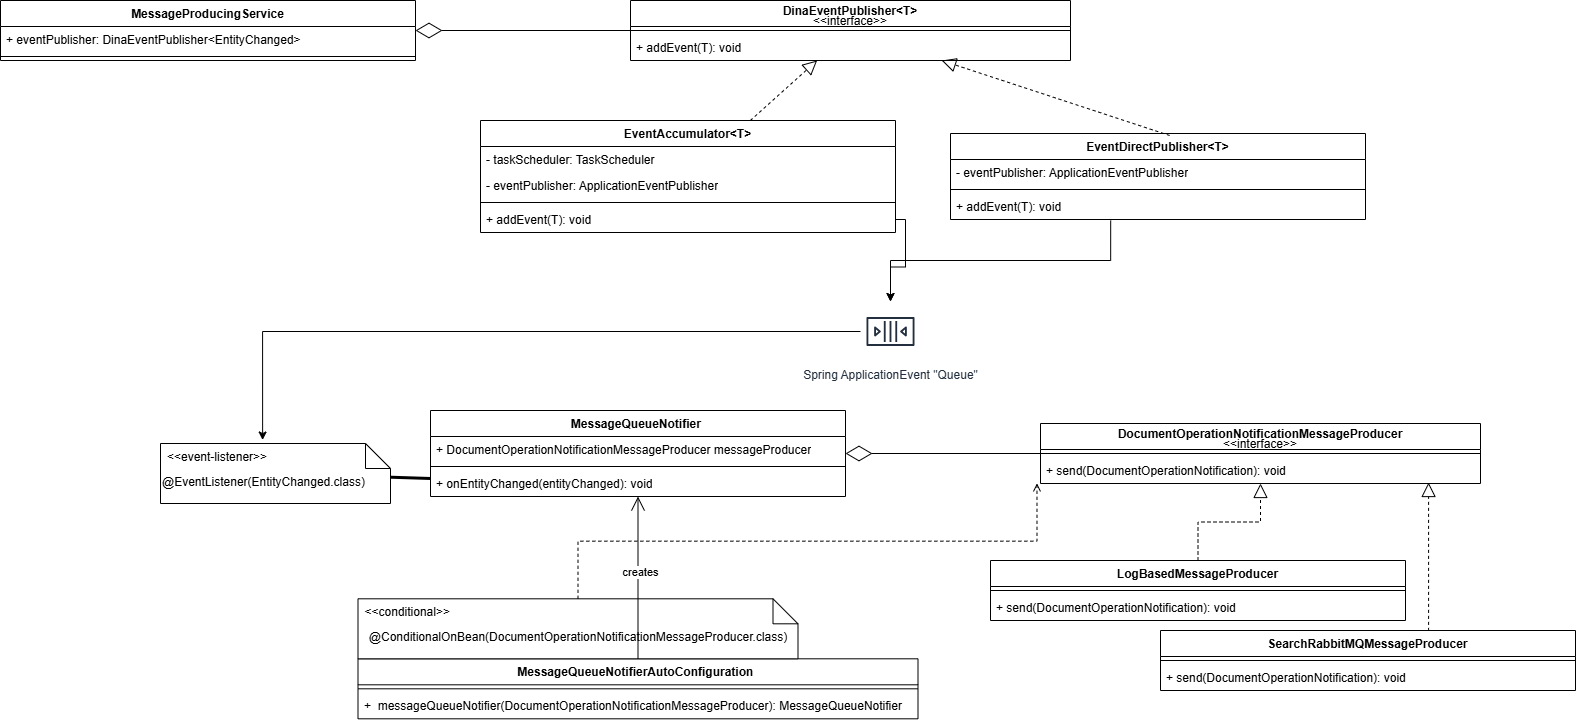
10.3. Message producer
Declare a RabbitMQQueueProperties and RabbitMQMessageProducer based beans.
@ConfigurationProperties(prefix = "dina.messaging.export")
@Component
@Named("theQueueProperties")
public class TheQueueProperties extends RabbitMQQueueProperties {
}
@Log4j2
@Service
@ConditionalOnProperty(prefix = "dina.messaging", name = "isProducer", havingValue = "true")
public class MyDinaMessageProducer extends RabbitMQMessageProducer implements DinaMessageProducer {
public RabbitMQDinaMessageProducer(RabbitTemplate rabbitTemplate, TheQueueProperties queueProperties) {
super(rabbitTemplate, queueProperties);
log.info( "Using RabbitMQ queue {}", queueProperties::getQueue);
}
}For search related messaging, implement DocumentOperationNotificationMessageProducer instead of the more generic DinaMessageProducer.
10.4. Message consumer
Declare a RabbitMQQueueProperties and RabbitMQConsumerConfiguration based beans.
@Configuration
@ConditionalOnProperty(prefix = "dina.messaging", name = "isConsumer", havingValue = "true")
public class TheQueueConsumerConfiguration extends RabbitMQConsumerConfiguration {

  public ObjectExportQueueConsumerConfiguration(@Named("exportQueueProperties")
                                                TheQueueProperties queueProperties) {
    super(queueProperties);
  }

  @Bean("theQueue")
  @Override
  public Queue createQueue() {
    return super.createQueue();
  }

  @Bean("theDeadLetterQueue")
  @Override
  public Queue createDeadLetterQueue() {
    return super.createDeadLetterQueue();
  }
}
Then on the consumer class you can use @RabbitListener(queues = "#{theQueueProperties.getQueue()}").
11. Validation
11.1. The Principles
From dina-base 0.51 onward, we disable the automatic validation and move it to the Service layer where Spring integration is better.
Before dina-base was mostly relying on JPA level validation which worked for most application but can be difficult when we need customization (internationalization and localization) or custom validations.
11.2. Implementation
Validation is done at the Service level and is automatically handled by DefaultDinaService.
There is 2 types of validation at the Service level :
-
Constraints validation (automatic checks that will use the constraint annotations on the Entity)
-
Business rule(s) validation (must be implemented by the concrete Service by overriding the
validateBusinessRulesmethod)
Constraint validation also supports validation group OnCreate and OnUpdate.
12. Auditing
JaVers is used to save snapshots of DTOs on create, update and delete events.
12.1. Setting up your Dina Repo for auditing
dina-base does not manage the database schema for auditing. The responsibility belongs to the specific module.
12.2. Prepare your DTO
Your DTO must be prepared with specific annotations specifically @TypeName, @Id, @PropertyName.
-
Add the Javers annotations to the DTO:
-
@TypeName should be added to the class for JaVers to know the type.
-
@Id and @PropertyName("id") should be added to the ID field, which JaVers uses to track multiple versions of the same entity.
-
@ShallowReference should be added to relation fields (along with Crnk’s @JsonApiRelation). This prevents a problem where the referenced resource is re-audited with all fields null.
-
@Value should be added to embedded objects, like other DTOs that are considered values of a parent DTO. e.g. "AddressDto" is an embedded Value in "PersonDto", not a standalone entity.
-
When a child value is changed, the parent object should also be updated (via timestamp update). This can be done using @PrePersist, @PreUpdate and @PreDelete annotations on the JPA Entity.
-
Child values should not be audited separately, regardless of database structure.
-
-
@DiffIgnore should be added to any fields not needed in the snapshots, like derived DTO fields.
-
Check out the supported annotations HERE for more details on how you can configure your domain.
12.3. Pass the Auditing service bean to your Dina repo
When the application runs with the property dina.auditing.enabled = true, an AuditService bean is available in the application context.
Simply pass this bean to your dina repository and auditing will be enabled for CREATE/DELETE/UPDATE operations.
12.4. Accessing the Auditing Endpoint
When the application runs with the property dina.auditing.enabled = true, the audit endpoint automatically starts.
JSONAPI endpoint at /audit-snapshot , implemented by the AuditSnapshotRepository class.
-
Page results using query parameters page[limit] and page[offset].
-
Filter the results:
-
By author:
filter[author]=authorname -
By instance:
filter[instanceId]=metadata/0fc10c52-91b6-4a9b-be98-e3f75b9928f7
-
13. Lazy Logging
We can avoid the calculation of log messages for log levels that are not enabled through the use of lazy logging.
To do so we use lambda expressions inside the logging statements available in Log4j 2.
logger.trace("Output: {}", getExpensiveOperation());log.trace("Output: {}", () -> getExpensiveOperation());log.trace("Name is {} and age is {}", () -> getName(), () -> getRandomNumber());The lambda expression is only evaluated if the corresponding log level is enabled.
See This Guide for more information.
14. External Types Guide
14.1. Set up your entity
Your entity needs to hold the identifier of the resource in a field.
private UUID acMetaDataCreator;14.2. Set up your DTO
Your Dto needs to declare the type of the field as a ExternalRelationDto and provide the needed annotations. The JsonApiExternalRelation type is the name of the resource type.
  @JsonApiExternalRelation(type = "agent")
  @JsonApiRelation
  private ExternalRelationDto acMetaDataCreator;
14.3. Set up your External Resource Provider Component
You need to create a component implementing an ExternalResourceProvider. A simple example would look like the following.
@Component
public class ExternalResourceProviderImplementation implements ExternalResourceProvider {

  public static final Map<String, String> typeToReferenceMap = ImmutableMap.of(
    "agent", "Agent/api/v1/agent");

  @Override
  public String getReferenceForType(String type) {
    return typeToReferenceMap.get(type);
  }

  @Override
  public Set<String> getTypes() {
    return typeToReferenceMap.keySet();
  }
}
Finally, you need to pass your ExternalResourceProvider to your DinaRepo.
 public DinaRepository<ProjectDTO, Project> projectRepo(
      BaseDAO baseDAO,
      DinaFilterResolver filterResolver,
      ExternalResourceProvider externalResourceProvider
    ) {
      return new DinaRepository<>(
        ...
        externalResourceProvider
      );
15. Releasing dina-base-api
The process of releasing dina-base-api is partially automated.
To initiate the process:
-
From dev branch
-
Run the GitHub Action
Prepare dina-base-api release -
Wait for CI to complete
-
-
From master locally
-
Pull the master branch
-
Merge dev into master (do NOT use Pull Request)
-
Push to master (it will trigger the deployment to the staging repository of Maven Central)
-
-
Create a new GitHub release
-
Add a Summary of the changes (looks at the previous versions for an example)
-
Publish the Release
-
-
From dev branch
-
Change the version by running
mvn versions:set -DnewVersion=X.X-SNAPSHOTfrom the root where X.X is the next increment in the version number -
Add and Push to dev with message like "Prepare next development version"
-
-
Release the artifact to Maven Central
-
Login to https://oss.sonatype.org/
-
Close the release from staging repository
-
Release the artifact
-